背景と目的
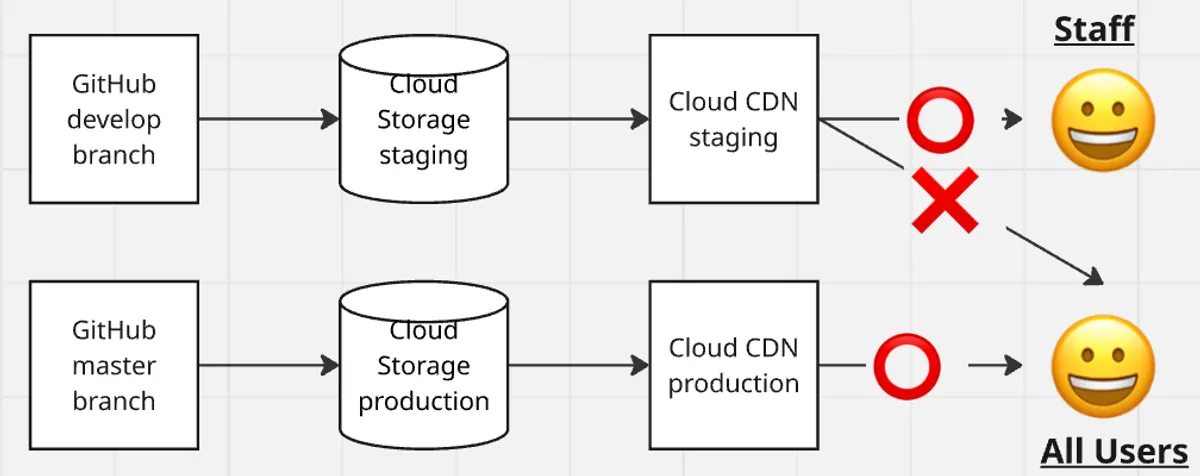
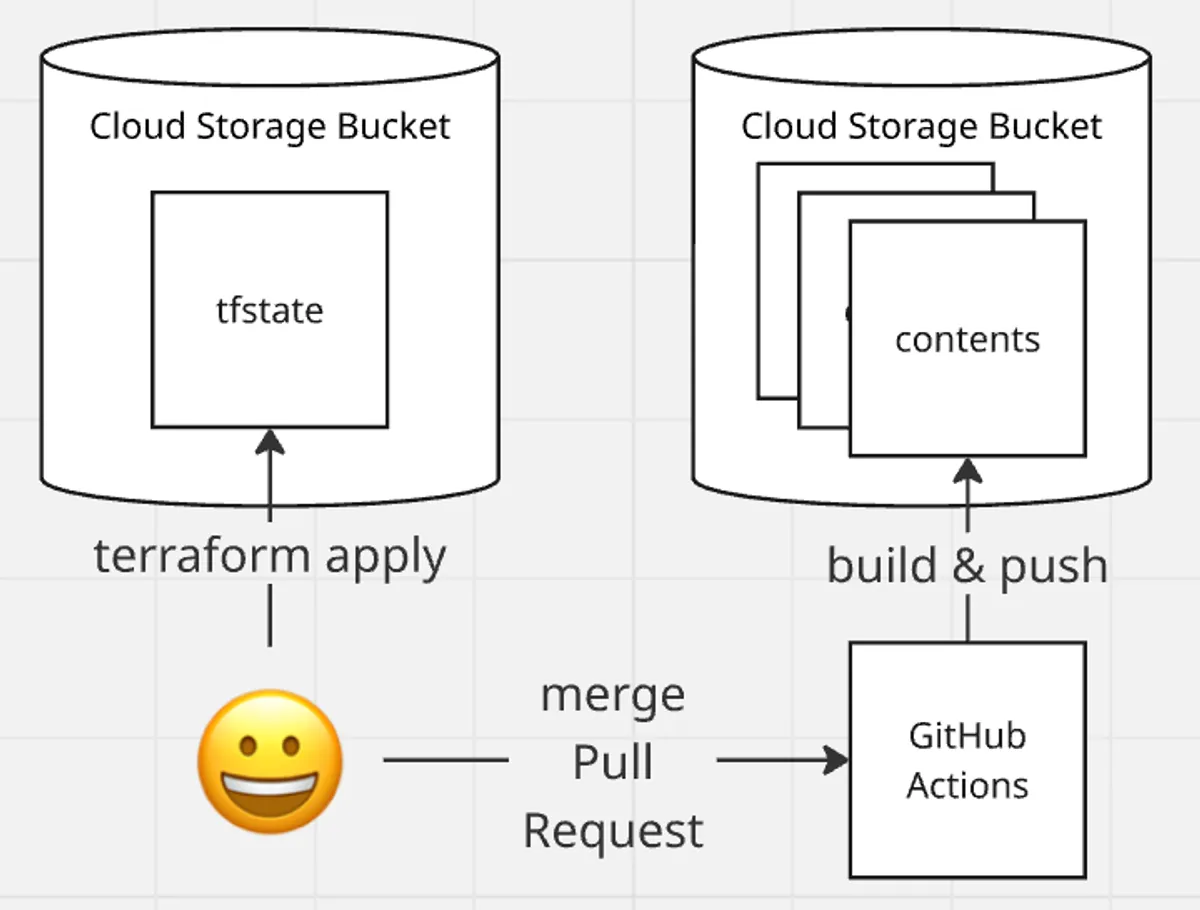
この Blog のコンテンツは Astro の静的サイトジェネレーターで生成されています。 詳細については、こちらで紹介されています。 GitHub で管理され、Pull Request がマージされると GitHub Actions でビルドされて Cloud Storage にアップロードされます。 Cloud Storage のコンテンツは、Load Balancer と Cloud CDN を通して配信されます。 また、ステージング環境は特定のIPアドレスからのみアクセス可能としています。 本記事ではコンテンツを生成してからユーザーに届くまでの仕組みについて説明します。
準備
本記事では、Terraformを使ってGCP環境を構築します。 Astro code がなければ、 こちらのリンク から作成して GitHub に push します。 GCP project がなければ、 こちらのリンク から作成します。 Google Cloud CLI がなければ、 こちらのリンク から作成します。 Terraform がなければ、 公式マニュアル を参考にインストールします。
対象のプロジェクトIDを環境変数に設定します。 以下のコマンドのyour-projectを変更してください。 プロジェクト名は、こちらから確認できます。
$ export GCP_PROJECT=your-projectTerraformは、状態情報をtfstateというファイルに保存します。 チームで運用するには、 tfstate を共有する必要があります。 今回は Cloud Storage を使って、tfstate を共有します。
tfstate 保存用 Bucket は、 Terraform 自体で作成できません。 以下のコマンドで作成します。
$ gcloud config set project ${GCP_PROJECT}
$ gsutil mb -p ${GCP_PROJECT} -c STANDARD -l asia-northeast1 gs://terraform-state-bucket-${GCP_PROJECT}/
$ gsutil versioning set on gs://terraform-state-bucket-${GCP_PROJECT}/
tfstate の誤更新が発生したとき巻き戻せるようにバージョニングを有効化しています。
Cloud Storage作成
Terraformでコンテンツ配信用のCloudStorage bucketを作成します。 ディレクトリ構成は、以下のようになります。
terraform
├── Makefile
├── env
│   ├── production.tfbackend
│   ├── production.tfvars
│   ├── staging.tfbackend
│   └── staging.tfvars
├── main.tf
├── providers.tf
└── variables.tf
まず、providers.tf を作成します。 ここでは、利用するクラウドベンダー(AWS/GCP/Azureなど)を設定します。 今回は Cloud Storage を利用するため、GCPを設定します。 project_id は環境毎に変わるため、変数として定義しています。 region は同じ値を各所に設定するため、不一致防止策として変数定義しています。
required_providers と provider で、Google Cloud 利用を宣言します。 backend で、 tfstate を保存する Terraform backend を指定します。 環境が1つの場合、ここで bucket を指定します。
terraform {
  required_providers {
    google = {
      source  = "hashicorp/google"
      version = "~> 5.0"
    }
  }

  backend "gcs" {
    prefix = "terraform/state"
  }

  required_version = ">= 1.11.0"
}

provider "google" {
  project = var.project_id
  region  = var.region
}
今回は staging と production の2つを管理するため、それぞれで違う bucket を指定できるようにします。 ここでは変数が使えないため、 以下のコマンドを使って、tfbackend ファイルに bucket 設定を記載します。
$ echo bucket = "terraform-state-bucket-${GCP_PROJECT}" > env/staging.tfbackend作成されたenv/staging.tfbackendは、以下のような内容になります。
bucket = "terraform-state-bucket-xxx"次にコンテンツ配信に利用する Cloud Storage Bucket を作成します。 バケット名は環境毎に異なるため、変数としています。
resource "google_storage_bucket" "static_bucket" {
  name     = var.bucket_name
  location = var.region
  uniform_bucket_level_access = true

  website {
    main_page_suffix = "index.html"
    not_found_page   = "404.html"
  }
}
variables.tf に変数を定義します。
variable "region" {
  description = "デフォルトのリージョン"
  type        = string
}

variable "project_id" {
  description = "Google Cloud Project ID"
  type        = string
}

variable "bucket_name" {
  description = "GCS バケット名"
  type        = string
}
環境毎の変数設定値を env/staging.tfvars に設定します。 自分の値に変更して、利用します。
project_id  = "your-project-id" # ステージング環境のプロジェクトID
region      = "asia-northeast1" # 東京
bucket_name = "static-content-your-project" # コンテンツ配信用バケット
以上で実装ができました。 ここから構築を行います。 まず、変更対象箇所の一覧を表示します。
$ terraform init -backend-config=./env/staging.tfbackend
Initializing the backend...
Initializing provider plugins...
- Reusing previous version of hashicorp/google from the dependency lock file
- Using previously-installed hashicorp/google v5.45.2

Terraform has been successfully initialized!
$ terraform plan -var-file=./env/staging.tfvars
...
Plan: 0 to add, x to change, 0 to destroy.
この変更で問題ないなら、以下のコマンドで構築します。
$ terraform apply -var-file=./env/staging.tfvars
...
Plan: 0 to add, x to change, 0 to destroy.

Do you want to perform these actions?
  Terraform will perform the actions described above.
  Only 'yes' will be accepted to approve.

  Enter a value: yes
...
Apply complete! Resources: 0 added, x changed, 0 destroyed.
以下のようなMakefileを書いておくと便利です。
init-staging:
	terraform init -backend-config=./env/staging.tfbackend

plan-staging:
	terraform plan -var-file=./env/staging.tfvars

apply-staging:
	terraform apply -var-file=./env/staging.tfvars
GitHub Actionsによるデプロイ
次にデプロイ設定を行います。 GitHub Actions からデプロイできるように、サービスアカウントを作成します。 このサービスアカウントには、Cloud Storage の管理者権限を付与します。
resource "google_service_account" "github-actions" {
  account_id   = "github-actions"
  display_name = "github-actions"
  project      = "${var.project_id}"
}

resource "google_project_iam_member" "github-actions-storage-object-admin" {
  project = "${var.project_id}"
  role    = "roles/storage.objectAdmin"
  member  = "serviceAccount:${google_service_account.github-actions.email}"
}
上記設定を反映します。
$ make apply-stagingサービスアカウントが作られました。 以下のコマンドで、サービスアカウントの key を作成します。
$ export KEY_FILE=key.json
$ export SA_NAME=github-actions-storage-object-admin
$ gcloud iam service-accounts keys create ${KEY_FILE} \
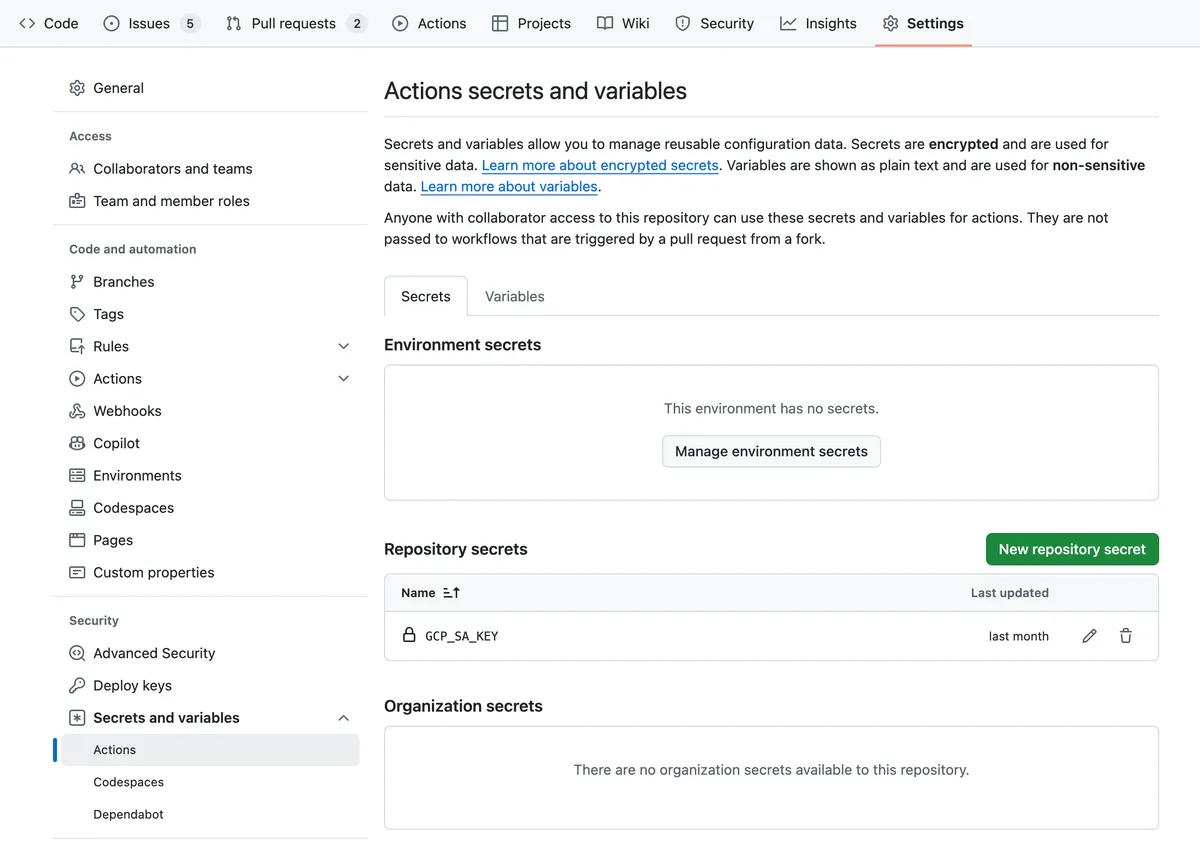
--iam-account=${SA_NAME}@${GCP_PROJECT}.iam.gserviceaccount.comサービスアカウントのキーは、key.jsonに保存されます。 これを GitHub に設定します。 GitHubのリポジトリ画面上部にある「Settings」タブを選択します。 Secrets and variables > Actions > Repository secrets > New repository secret のボタンを押下すると、入力フォームが表示されます。 Name に GCP_SA_KEY 、 Secret に先ほど取得した key.json の中身を貼り付けます。 同様に Name に GCP_CS_BUCKET 、 Secret にコンテンツ格納用バケット名を記載します。
これで権限設定ができたので、GitHub Actions を実装していきます。 実装するコードは3つです。
- pr-build.yml: Pull Request が変更されたら、正常にビルドできるか確認します。
- deploy-staging.yml: develop branch が変更されたら、検証環境にデプロイします。
- deploy-production.yml: master branch が変更されたら、本番環境にデプロイします。
ディレクトリ構成は、以下のようになります。
.github
└── workflows
    ├── deploy-production.yml
    ├── deploy-staging.yml
    └── pr-build.yml
まず、 pr-build.yml を実装します。 Pull Request が更新されたとき実行され、Pull Requestの画面に結果が反映されます。 マージするとビルド結果をデプロイするため、ビルドできないものがマージされる事を防ぎたいと思います。 そこで、ビルド失敗を検知しています。
name: PR Build

on:
  pull_request:
    types:
      - opened
      - synchronize
      - reopened

permissions:
  contents: read
  actions: write

jobs:
  build:
    runs-on: ubuntu-latest

    steps:
      - name: Checkout repository
        uses: actions/checkout@v4

      - name: Install pnpm
        uses: pnpm/action-setup@v4

      - name: Setup Node.js
        uses: actions/setup-node@v4
        with:
          node-version: 22
          cache: 'pnpm'

      - name: Install dependencies
        run: pnpm install --frozen-lockfile

      - name: Build project
        run: pnpm build
次に deploy-staging.yml を実装します。 これは、develop branch が変更されたとき、実行されます。 ビルドまでは、pr-build.yml と同様です。 ビルドされた成果物を Cloud Storage にアップロードしています。 アップロードには、先ほど設定した Service Account Key を利用します。 pathにはアップロードする成果物が格納されているディレクトリーを指定します。 Astroの成果物はデフォルトでは、apps/Astroプロジェクト名/dist/以下に書き出されています。 その1行だけ変更すれば、動きます。
name: Deploy to GCS on staging

on:
  push:
    branches:
      - develop

permissions:
  contents: read
  actions: write
  id-token: write

jobs:
  build:
    runs-on: ubuntu-latest

    steps:
      - name: Checkout repository
        uses: actions/checkout@v4

      - name: Install pnpm
        uses: pnpm/action-setup@v4

      - name: Setup Node.js
        uses: actions/setup-node@v4
        with:
          node-version: 22
          cache: 'pnpm'

      - name: Install dependencies
        run: pnpm install --frozen-lockfile

      - name: Build project
        run: pnpm build

      - name: Authenticate with Google Cloud
        uses: google-github-actions/auth@v2
        with:
          credentials_json: ${{ secrets.GCP_SA_KEY }}

      - name: Upload files to GCS
        uses: google-github-actions/upload-cloud-storage@v2
        with:
          path: ./apps/your-project/dist/
          destination: ${{ secrets.GCP_CS_BUCKET }}
          parent: false
deploy-production.yml は、後半の本番環境構築で作成します。
Load Balancerの作成
SSL証明書の発行には、証明書のドメイン名が証明書が設定されるLoad Balancerを指している必要があります。 そこで、IP発行、DNS設定、証明書とLoad Balancerの作成の順に進めていきます。 まず、固定IPを1つ予約するため、main.tfに以下の3行を追加します。
resource "google_compute_global_address" "lb_ip_address" {
  name = "lb-ip-address"
}
追加した設定を反映します。
$ make apply-staging
$ gcloud compute addresses list
NAME           ADDRESS/RANGE   TYPE      PURPOSE  NETWORK  REGION  SUBNET  STATUS
lb-ip-address  x.x.x.x         EXTERNAL
表示されたIPアドレスをDNSに設定します。 設定後に手元から引けるかどうか確認します。
$ dig xxx.example.com
xxx.example.com.	300	IN	A	x.x.x.x
main.tf を以下のものに置き換えます。 これまで行った変更に加え、Load Balancer設定が含まれています。
resource "google_compute_global_address" "lb_ip_address" {
  name = "lb-ip-address"
}

resource "google_storage_bucket" "static_bucket" {
  name     = var.bucket_name
  location = var.region
  uniform_bucket_level_access = true

  website {
    main_page_suffix = "index.html"
    not_found_page   = "404.html"
  }
}

resource "google_compute_backend_bucket" "cdn_backend" {
  name        = "cdn-backend"
  bucket_name = google_storage_bucket.static_bucket.name
  edge_security_policy = google_compute_security_policy.cloud_armor_policy.id
  enable_cdn  = true
  cdn_policy {
    cache_mode        = "CACHE_ALL_STATIC"
    client_ttl        = 31536000 # 1 year
    default_ttl       = 31536000 # 1 year
    max_ttl           = 31536000 # 1 year
    negative_caching  = true
    serve_while_stale = 86400 # 1 day
    request_coalescing = true
  }
}

resource "google_compute_url_map" "cdn_url_map" {
  name            = "url-map-default"
  default_service = google_compute_backend_bucket.cdn_backend.id
}

resource "google_compute_managed_ssl_certificate" "lb_default" {
  name     = "ssl-cert"
  managed {
    domains = [var.domain]
  }
}

resource "google_compute_target_https_proxy" "https_proxy" {
  name             = "https-proxy"
  url_map          = google_compute_url_map.cdn_url_map.id
  ssl_certificates = [
    google_compute_managed_ssl_certificate.lb_default.name
  ]
  depends_on       = [
    google_compute_managed_ssl_certificate.lb_default
  ]
}

resource "google_compute_global_forwarding_rule" "https_forwarding" {
  name       = "https-forwarding-rule"
  ip_address = google_compute_global_address.lb_ip_address.address
  target     = google_compute_target_https_proxy.https_proxy.id
  port_range = "443"
}

resource "google_compute_security_policy" "cloud_armor_policy" {
  name = "cloud-armor-ip-restrict"
  type = "CLOUD_ARMOR_EDGE"

  rule {
    action   = "allow"
    priority = 100
    match {
      versioned_expr = "SRC_IPS_V1"
      config {
        src_ip_ranges = var.allowed_ips
      }
    }
    description = "Allow specific IPs"
  }

  rule {
    action   = "deny(403)"
    priority = 2147483647
    match {
      versioned_expr = "SRC_IPS_V1"
      config {
        src_ip_ranges = ["*"]
      }
    }
    description = "default rule"
  }
}

resource "google_storage_bucket_iam_binding" "viewer_role" {
  bucket = google_storage_bucket.static_bucket.name
  role   = "roles/storage.objectViewer"
  members = [
    "allUsers"
  ]
}

resource "google_service_account" "github-actions" {
  account_id   = "github-actions"
  display_name = "github-actions"
  project      = "${var.project_id}"
}

resource "google_project_iam_member" "github-actions-storage-object-admin" {
  project = "${var.project_id}"
  role    = "roles/storage.objectAdmin"
  member  = "serviceAccount:${google_service_account.github-actions.email}"
}
variables.tf も以下のように変更します。
variable "region" {
  description = "デフォルトのリージョン"
  type        = string
}

variable "project_id" {
  description = "Google Cloud Project ID"
  type        = string
}

variable "bucket_name" {
  description = "GCS バケット名"
  type        = string
}

variable "allowed_ips" {
  description = "許可するIPアドレスのリスト"
  type        = list(string)
}

variable "domain" {
  description = "証明書ドメイン名"
  type        = string
}
env/staging.tfvars には、自分の環境設定を記載します。
project_id  = "your-project-id" # ステージング環境のプロジェクトID
region      = "asia-northeast1" # 東京
bucket_name = "static-content-your-project" # コンテンツ配信用バケット
allowed_ips = ["192.168.0.0/24"] # 社内IPアドレスを許可
domain      = "your-project.example.com" # 証明書のドメイン
設定変更が終わったので、反映します。
$ make apply-stagingこれでstaging環境が構築されました。 指定したIPレンジからのみアクセスされることを確認してみてください。
本番環境構築
本番環境用設定を env/production.tfvars に作成します。
project_id  = "your-project-id" # 本番環境のプロジェクトID
region      = "asia-northeast1" # 東京
bucket_name = "static-content-your-project" # コンテンツ配信用バケット
allowed_ips = ["0.0.0.0/0"] # すべてのIPアドレスを許可
domain      = "your-project.example.com" # 証明書のドメイン
同様に production.tfbackend に本番用 tfstate 格納バケットを設定します。
bucket = "terraform-state-bucket-your-project"stagingと同様に、本番用 tfstate 格納バケットを作成します。
$ export GCP_PROJECT=your-project
$ gcloud config set project ${GCP_PROJECT}
$ gsutil mb -p ${GCP_PROJECT} -c STANDARD -l asia-northeast1 gs://terraform-state-bucket-${GCP_PROJECT}/
$ gsutil versioning set on gs://terraform-state-bucket-${GCP_PROJECT}/
これを本番環境に適用します。
$ terraform init -backend-config=./env/production.tfbackend
$ terraform apply -var-file=./env/production.tfvars
IPアドレスを取得し、DNS設定を行います。
$ gcloud compute addresses list
NAME           ADDRESS/RANGE   TYPE      PURPOSE  NETWORK  REGION  SUBNET  STATUS
lb-ip-address  x.x.x.x         EXTERNAL
Service Account Key を取得して、GitHubにGCP_SA_KEY_PRODUCTIONというkeyで設定します。 同様に GCP_CS_BUCKET_PRODUCTIONというkeyにコンテンツ格納用バケット名を設定します。
$ gcloud iam service-accounts keys create ${KEY_FILE} \
    --iam-account=${SA_NAME}@${GCP_PROJECT}.iam.gserviceaccount.com
デプロイ用のGitHub Actionsを追加します。 deploy-staging.yml をコピーして、deploy-production.yml を作成します。
branches:
  - master # ここを変更 develop-->master
---
credentials_json: ${{ secrets.GCP_SA_KEY_PRODUCTION }} # ここを変更
---
destination: ${{ secrets.GCP_CS_BUCKET_PRODUCTION }} # ここを変更
masterブランチへのPull Requestを作り、それをmergeすると10分程度で本番環境に反映されます。
まとめ
Astroで生成された静的ウェブサイトをCloudStorageでホストする方法について解説しました。 同様の目的で書かれたBlogは複数ありましたが、「本番検証環境の使い分け」と「GitHub Actionsを使ったデプロイ」については記載が見つかりませんでした。 その2点が従来方式に比べて新しい点かと思います。 少しでも皆様のお役に立てれば幸いです。